Media Release:
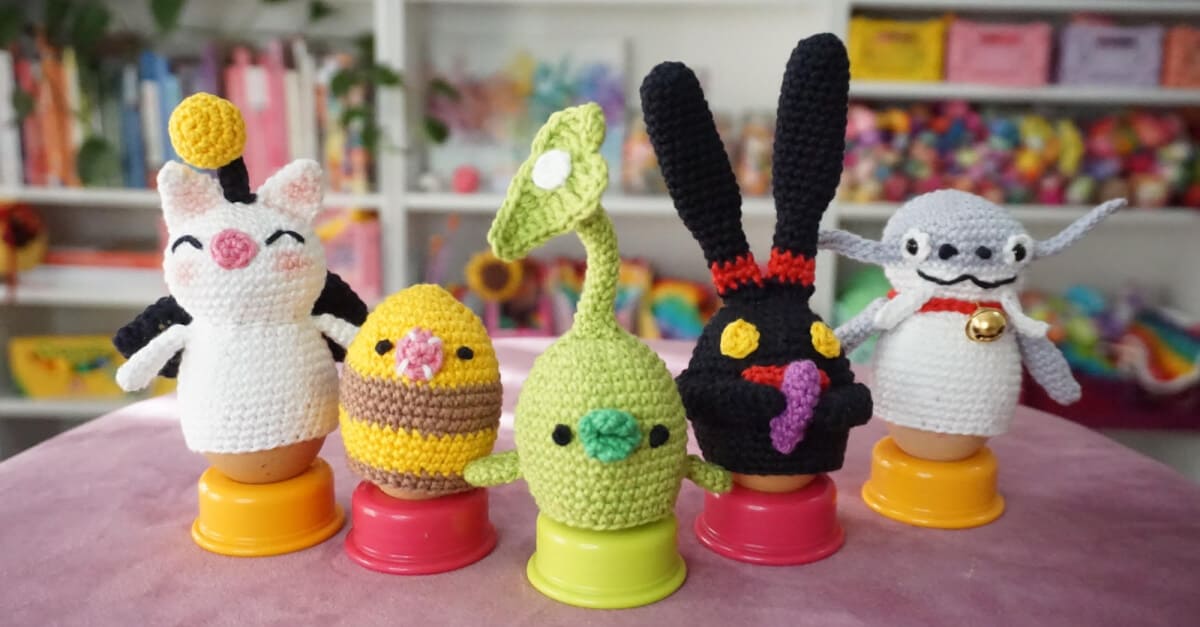
How are you celebrate your Easter? Eating too much with family? Binging on Chocolate or playing Final Fantasy XIV Online?
Well, thanks to the most unlikely partnership between Final Fantasy XIV Online & an Aussie mum, Natalie Schwarz from Little Cosy Things. I plan on teaching myself to crochet & make these egg cosies based on iconic characters from the game.
In all honesty, I’ll probably go out & buy all the stuff. Then realise I have chubby fingers, cry & give up.
Yet, how adorable are these things? I owe it to myself to try, and just looking at the below Basic Patterns; Natalie has made it so easy. So if like me, you want to try these Little Cosy Things Egg Cosies. Learn using the Basic Pattern & download the patterns to make your very own Final Fantasy XIV Official Egg Cosies
Basics Pattern
We will be working in continuous rounds for all parts of this pattern (except the leaf). Use a stitch marker on the last stitch of every round, moving it up as you go, so you can mark your place.
When following the patterns below, the number in brackets at the end of every round is the stitch count for that round. Use this to make sure you have done the correct amount of stitches for that round.
Chain (ch)

Begin with a slip knot on your hook; you will have one loop on your hook (however, this first loop does not count as a chain). Yarn over and draw the yarn through the loop – you have made one chain. Repeat for however many chain stitches the pattern requires.
Slip Stitch (sl st)

A slip stitch can be used for joining, shaping or for skipping stitches. To make a slip stitch, without yarning over, insert hook into the next stitch. Yarn over, and pull the yarn through both loops on the hook.
Single Crochet (SC)

Insert hook into next stitch, yarn over and draw up a loop (2 loops on the hook), yarn over and pull through 2 loops on the hook.
Half Double Crochet (hdc)

Yarn over and insert hook into the next stitch. Yarn over and pull up a loop (3 loops on hook); yarn over and pull yarn through all 3 loops on the hook.
Double Crochet (dc)

Yarn over and insert hook into the next stitch. Yarn over and pull up a loop (3 loops on hook); yarn over and pull through 2 loops, yarn over and pull through 2 loops once more.
Triple Crochet (tc)

Yarn over and insert hook into the next stitch. Yarn over, twice, and pull up a loop (4 loops on hook); yarn over and pull yarn through 2 loops, 3 times.
And if you need a simpler list of all the crochet terms, here it is:
- ch – chain
- st – stitch
- sl st – slip stitch
- sc – single crochet
- hdc – half double crochet
- dc – double crochet
- tc – triple crochet
- inc – (increase) 2 stitches in the same stitch
- dec – (decrease) sc 2 stitches together
OK! So now we have learnt everything you need to get started?…. except the patterns, but I got you covered.
Moogle
Pattern
Body
Using white yarn:
Round 1: Make a magic ring, or chain 4 and slip stitch to the first chain to form a ring. 6 single crochet into the ring (6)
Round 2: Increase in each stitch (12)
Round 3: (1 single crochet, increase) repeat (18)
Round 4: (2 single crochets, increase) repeat (24)
Round 5: (3 single crochets, increase) repeat (30)
Round 6: 1 single crochet in each stitch (30)
Round 7: (4 single crochets, increase) repeat (36)
Round 8: 1 single crochet in each stitch (36)
Round 9: (5 single crochets, increase) repeat (42)
Round 10-13: 1 single crochet in each stitch (42)
Round 14: (5 single crochets, decrease) repeat (36)
Round 15-16: 1 single crochet in each stitch (36)
** As each egg will be slightly different in size, you may need to skip round 17 if the egg cosy is too tight for your egg, or if you are using a large egg cup. **
Round 17: (4 single crochets, decrease) repeat (30)
Fasten off, weave in tail.
Head
Using white yarn:
Round 1: Make a magic ring, or chain 4 and slip stitch to the first chain to form a ring. 6 single
crochet into the ring (6)
Round 2: Increase in each stitch (12)
Round 3: (1 single crochet, increase) repeat (18)
Round 4: (2 single crochets, increase) repeat (24)
Round 5: (3 single crochets, increase) repeat (30)
Round 6: (4 single crochets, increase) repeat (36)
Round 7: (5 single crochets, increase) repeat (42)
Round 8-10: 1 single crochet in each stitch (42)
Round 11: (5 single crochets, decrease) repeat (36)
Fasten off, leaving a long tail.
Nose
Using pink yarn:
Round 1: Make a magic ring, or chain 4 and slip stitch to the first chain to form a ring. 6 single crochet into the ring (6)
Fasten off, leaving a long tail.
Pom Pom
Using yellow yarn:
Round 1: Make a magic ring, or chain 4 and slip stitch to the first chain to form a ring. 6 single crochet into the ring (6)
Round 2: Increase in each stitch (12)
Round 3: (1 single crochet, increase) repeat (18)
Round 4-5: 1 single crochet in each stitch (18)
Round 6: (1 single crochet, decrease) repeat (12) Stuff lightly.
Round 7: Decrease in each stitch (6)
Fasten off, with a darning needle sew closed the small hole left at the end of round 8 with the tail. Weave in the ends.
Antenna
Using black yarn:
Row 1: Chain 5. 1 single crochet in the second chain from the hook, 1 single crochet in the remaining chains. Fasten off, leave a tail for sewing.
Arms (make 2)
Using white yarn:
Round 1: Make a magic ring, or chain 4 and slip stitch to the first chain to form a ring. 6 single crochet into the ring (6)
Round 2-7: 1 single crochet in each stitch (6)
Do not stuff. Fasten off, leaving a long tail.
Wings (make 2)
Using black yarn:
Row 1: Make a magic ring, or chain 2. 3 double crochet into the ring OR 3 double crochet into the second chain from the hook (6). Chain 3 and turn. Chain 3 does not count as a stitch, here and throughout.
Row 2: 2 double crochets in each stitch (12). Chain 3, turn.
Row 3: (1 double crochet, increase) repeat (18)
Row 4: Working down the side now of the last double crochet made, 1 single crochet. 1 single crochet around the outside of each wing. Slip stitch back into the beginning single crochet.
Fasten off, leaving a long tail.
Ears (make two)
Using white yarn:
Round 1: Make a magic ring, or chain 4 and slip stitch to the first chain to form a ring. 6 single crochet into the ring (6)
Round 2: 1 single crochet in each stitch (6)
Round 3: (1 single crochet, increase) repeat (9)
Round 4: (2 single crochet, increase) repeat (12)
Round 5: 1 single crochet in each stitch (12)
Fasten off, leaving a long tail.
Assembly
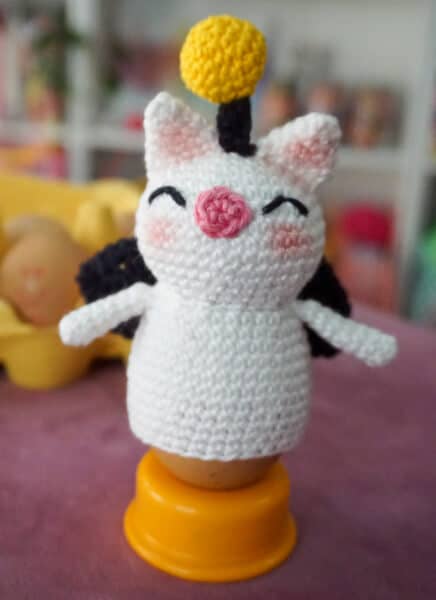
We begin by sewing the ears to the top of Moogle’s head. The ears are sewn between round 1 and 6.
Once the ears are attached, we can use them as a guide to sewn on the nose. Using the long tail, sew the nose to the head, directly in the centre of both ears, from round 5 to 8.
Next we will use a long piece of black yarn to embroider Moogle’s eye. The eyes are a slightly curved line, to look like Moogle is smiling. Use the photo below as a reference.

Stuff Moogle’s head lightly, we don’t want to make it too heavy for the egg underneath, and using the long tail, sew the head onto the body.
Next, we will sew the arms to each side of the body, using the ears as a guide. The arms are sewn just a row below where you joined the head to the body.
The wings are sewn on next. Turn your Moogle around, and taking the first wing, sew one corner of the wing to the centre of Moogle’s back, approximately 3 rows below where you joined the head and the body. Once one wing has been sewn on, you can sew on the next wing. Again only sewing the corner of the wing to the body, directly next to the first wing.
You can now attach the antenna to the pom pom. Using the tail of the antenna, sew it to the underside of the pom pom. Take the same tail, and sew the antenna to the very top of Moogle’s head, in between the ears. Just sew down the very top 2 stitches of the antenna, and the pom pom will stand up.
Lastly, take a small brush, or a cotton tip, and using a tiny bit of pink makeup blush or chalk pastel, dust some pink onto Moogle’s cheeks, just below the eyes. As well as the inside of each ear. Less is more, use a very light hand and slowly build up the colour.
Now, carefully, slip your finished Moogle Egg Cosy over your egg, and you are finished!
Spriggan
Pattern
Body
Using black yarn:
Round 1: Make a magic ring, or chain 4 and slip stitch to the first chain to form a ring. 6 single crochet into the ring (6)
Round 2: Increase in each stitch (12)
Round 3: (1 single crochet, increase) repeat (18)
Round 4: (2 single crochets, increase) repeat (24)
Round 5: (3 single crochets, increase) repeat (30)
Round 6: 1 single crochet in each stitch (30)
Round 7: (4 single crochets, increase) repeat (36)
Round 8: 1 single crochet in each stitch (36)
Round 9: (5 single crochets, increase) repeat (42)
Round 10-13: 1 single crochet in each stitch (42)
Round 14: (5 single crochets, decrease) repeat (36)
Round 15-16: 1 single crochet in each stitch (36)
** As each egg will be slightly different in size, you may need to skip round 17 if the egg cosy is too tight for your egg, or if you are using a large egg cup.**
Round 17: (4 single crochets, decrease) repeat (30)
Fasten off, weave in tail.
Arms (Make two)
Using black yarn:
Round 1: Make a magic ring, or chain 4 and slip stitch to the first chain to form a ring. 6 single crochet into the ring (6)
Round 2-11: 1 single crochet in each stitch (6)
Do not stuff. Fasten off, leaving a long tail
Crystal
Using purple yarn:
Round 1: Make a magic ring, or chain 4 and slip stitch to the first chain to form a ring. 6 single crochet into the ring (6)
Round 2: 1 single crochet in each stitch (6)
Round 3: (1 single crochet, increase) repeat (9)
Round 4-5: 1 single crochet in each stitch (9)
Round 6: (1 single crochet, decrease) repeat (9)
Round 7: 1 single crochet in each stitch (9)
Do not stuff. Fasten off, leaving a long tail.
Ears (Make two)
Using black yarn:
Round 1: Make a magic ring, or chain 4 and slip stitch to the first chain to form a ring. 6 single crochet into the ring (6)
Round 2: Increase in each stitch (12)
Round 3-15: 1 single crochet in each stitch (12)
Round 16: (1 single crochet, decrease) repeat (8)
Round 17-19: 1 single crochet in each stitch (8) change to red yarn on last stitch of round 19
Round 20-21: 1 single crochet in each stitch (8) change back to black yarn on last stitch of round 21
Round 22: 1 single crochet in each stitch (8)
Do not stuff. Fasten off, leaving a long tail.
Eyes (Make two)
Using yellow yarn:
Round 1: Make a magic ring, or chain 4 and slip stitch to the first chain to form a ring. 6 single crochet into the ring (6)
Fasten off, leaving a long tail.
Mouth
Using red yarn:
Chain 6 single crochet in the second chain from the hook. Single crochet in the next 4 stitches. 3 single crochet into the last stitch. Now turn, and work back down the other side of the chains. 1 single crochet in the next 3 stitches. 2 single crochet into the last stitch.
Slip stitch into the first stitch, and fasten off, leaving a long tail.
Assembly
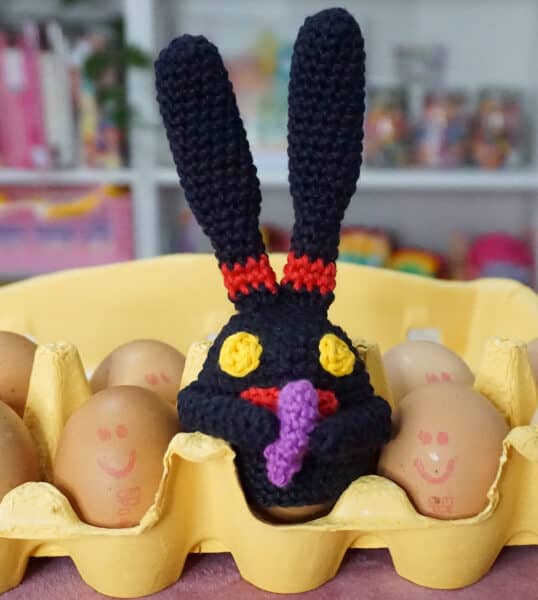
Start by sewing the ears onto the very top of the body. You want to position the left ear so the front bottom right of the ear is in the middle of the magic ring made in the first round, and the bottom left of the ear is on round 3 or 4.
Then sew the right ear on the other side of the left ear, with the bottom right of the ear on round 3 or 4, the same round as the left ear; and the bottom left of the ear is in the middle of the magic ring in the first round of the body. Weave in the remaining tail and snip.
Next, using the ears as a guide, sew the arms onto either side of the body, parallel to each ear. The arms will be sewn on horizontally, like they are outstretched in front of the body. Please use the photos as a guideline. The arms are sewn between rounds 11 – 13 on each side of the body. Next we will sew on the eyes. As a guide, the furthest side of each eye runs parallel in line with the outside corner of each ear; Spriggan’s eyes are quite wide set apart. Use the photos as a guide.
The eyes are sewn between rounds 5-8 approximately, with 5 stitches between.

Before we sew on the mouth, we want to attach the crystal to just one hand. Do not snip off the remaining tail, as we will use it to attach to the second hand, after we have attached the mouth. Using the tail from the crystal, sew the crystal onto the inside of the right hand only.
Now we can attach the mouth, sewing between rounds 9-10; which is approximately 2 rounds below the eyes. Weave in the tail & snip.
Thread your needle again with the remaining tail from the crystal, and bring over the remaining unstitched left arm. Using the tail of the crystal, sew the other side of the crystal to the inside of the left arm, so Spriggan is now holding the crystal between his right and left arm, in front of his mouth.
Now, carefully slip your finished Spriggan Egg Cosy over your egg, and you are finished!
Namazu
Pattern
Body
Using white yarn:
Round 1: Make a magic ring, or chain 4 and slip stitch to the first chain to form a ring. 6 single crochet into the ring (6)
Round 2: Increase in each stitch (12)
Round 3: (1 single crochet, increase) repeat (18)
Round 4: (2 single crochets, increase) repeat (24)
Round 5: (3 single crochets, increase) repeat (30)
Round 6: 1 single crochet in each stitch (30)
Round 7: (4 single crochets, increase) repeat (36)
Round 8: 1 single crochet in each stitch (36)
Round 9: (5 single crochets, increase) repeat (42)
Round 10-13: 1 single crochet in each stitch (42)
Round 14: (5 single crochets, decrease) repeat (36)
Round 15-16: 1 single crochet in each stitch (36)
** As each egg will be slightly different in size, you may need to skip round 17 if the egg cosy is too tight for your egg, or if you are using a large egg cup. **
Round 17: (4 single crochets, decrease) repeat (30)
Fasten off, weave in tail.
Arms (make 2)
Using grey yarn:
Round 1: Make a magic ring, or chain 4 and slip stitch to the first chain to form a ring. 6 single crochet into the ring (6)
Round 2-3: 1 single crochet in each stitch (6)
Round 4: (1 single crochet, increase) repeat (9)
Round 5-8: 1 single crochet in each stitch (9)
Round 9: (2 single crochet, increase) repeat (12)
Round 10-11: 1 single crochet in each stitch (12)
Fasten off, leaving a long tail.
Mandibular Barbel (make 2)
Using white yarn:
Row 1: Chain 6 stitches. 1 single crochet in the second stitch from the hook. 1 single crochet in the next 3 stitches.
Fasten off, leaving a long tail
Maxillary Barbel (make 2)
Using grey yarn:
Row 1: Chain 11 stitches. 1 single crochet in the second stitch from the hook. 1 single crochet in the next 9 stitches.
Fasten off, leaving a long tail.
Head
Using grey yarn:
Round 1: Make a magic ring, or chain 4 and slip stitch to the first chain to form a ring. 6 single crochet into the ring (6)
Round 2: Increase in each stitch (12)
Round 3: (1 single crochet, increase) repeat (18)
Round 4: (2 single crochets, increase) repeat (24)
Round 5: (3 single crochets, increase) repeat (30)
Round 6: (4 single crochets, increase) repeat (36)
Round 7: (5 single crochets, increase) repeat (42)
Round 8-10: 1 single crochet in each stitch (42) change to white yarn
Round 11: (5 single crochets, decrease) repeat (36)
Fasten off, leaving a long tail.
Bell necktie
Leave making the necktie until you have sewed the head to the body
Using Red Yarn:
Row 1: Leave a long tail for sewing, and chain 27 stitches.
Measure your necktie around Namazu’s neck, you may need to add or remove chains, depending on how much stuffing you used on his head. Once happy with the size fasten off, leaving another long tail.
Eyeball (make 2)
Using White Yarn:
Round 1: Make a magic ring, or chain 4 and slip stitch to the first chain to form a ring. 6 single crochet into the ring (6)
Fasten off, weave in all tails.
Assembly
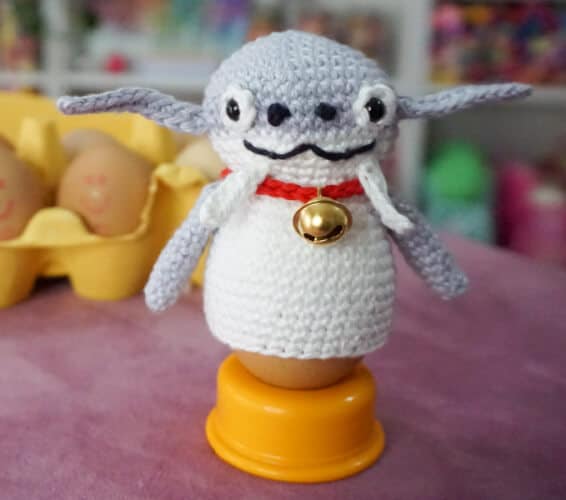
Begin by attaching the safety eyes first to the white eyeballs, and then to the head. Insert a safety eye directly into the centre of each eyeball. Then take the eye and insert into the head between rounds 9-10, at approximately 8 stitches apart. Make sure you have them in the correct position, before attaching the washes at the back of the safety eyes, as they cannot be removed once fixed in place.
Next make 2 French Knots with black yarn for the nostrils, in between the eyes (1 stitch away from each eye, with a space of 2 stitches between each nostril). To make a French Knot for the eyes; insert the darning needle inside the head, and pull out through a stitch to the outside, where you would like the nostril to be. Wrap the yarn around the needle, 4 times and keep it taught, while pushing the needle back down through the closest stitch. Pull through tight on the other side. A little knot should have formed for the nostril.
Once the nostrils are in place, use the same black yarn to sew the mouth.

Once the head is sewn on, you can now sew the mandibular barbels to the bottom of the head, approximately 1 row below the mouth. Attach the arms to either side of the body, one row below where the head is attached.Sew the maxillary barbels to the side of the head, one to the left of one eye, and one to the right, approx. 2 stitches from the eyeball. The barbels are sewn on rounds 11 and 12. Stuff the head firmly, and using the tail, sew the head onto the top of the body.
Lastly, make the bell necktie, and thread a bell through onto the middle of the chain. Using the 2 long tails, tie the bell necktie around Namazu’s neck.
Now, carefully slip your finished Namazu Egg Cosy over your egg, and you are finished!
Korpokkur Kid
Pattern
Body
Using lime green Yarn:
Round 1: Make a magic ring, or chain 4 and slip stitch to the first chain to form a ring. 6 single crochet into the ring (6)
Round 2: Increase in each stitch (12)
Round 3: (1 single crochet, increase) repeat (18)
Round 4: (2 single crochets, increase) repeat (24)
Round 5: (3 single crochets, increase) repeat (30)
Round 6: 1 single crochet in each stitch (30)
Round 7: (4 single crochets, increase) repeat (36)
Round 8: 1 single crochet in each stitch (36)
Round 9: (5 single crochets, increase) repeat (42)
Round 10-13: 1 single crochet in each stitch (42)
Round 14: (5 single crochets, decrease) repeat (36)
Round 15-16: 1 single crochet in each stitch (36)
** As each egg will be slightly different in size, you may need to skip round 17 if the egg cosy is too tight for your egg, or if you are using a large egg cup. **
Round 17: (4 single crochets, decrease) repeat (30)
Fasten off, weave in tail.
Beak (make 2)
Using grass green yarn:
Round 1: Make a magic ring, or chain 4 and slip stitch to the first chain to form a ring. 5 single crochet into the ring (5)
Round 2: Increase in each stitch (10)
Fasten off, leaving a long tail.
Wings (make 2)
Using lime green yarn:
Round 1: Make a magic ring, or chain 4 and slip stitch to the first chain to form a ring. 4 single crochet into the ring (4)
Round 2: Increase in each stitch (8)
Round 3-5: 1 single crochet in each stitch (8)
Fasten off, leaving a long tail.
Dew Drop
Using paper white yarn:
Round 1: Make a magic ring, or chain 4 and slip stitch to the first chain to form a ring. 6 single crochet into the ring (6)
Fasten off, leaving a long tail.
Stem
Using lime green yarn:
Round 1: Make a magic ring, or chain 4 and slip stitch to the first chain to form a ring. 6 single crochet into the ring (6)
Round 2-7: 1 single crochet in each stitch (6)
Round 8: Decrease, 1 single crochet, increase, 1 single crochet in next 2 stitches (6)
Round 9: 1 single crochet in each stitch (6)
Repeat round 8 and 9 – 2 more times
Round 10: (1 single crochet, increase) repeat (12)
Fasten off, leaving a long tail.
Leaf
Using lime green yarn:
Row 1: Chain 11 stitches
1 double crochet in second stitch from the hook, 2 double crochets in the next stitch, 2 triple crochets in the next 2 stitches, 2 double crochets in the next stitch, 1 double crochet in the next stitch, 1 half double crochet in the next 2 stitches, 1 single crochet in the next 2 stitches, 3 single crochets in the last stitch.
Turn and work back up the other side of the chains.
Row 2: 1 single crochet in the next 2 stitches, 1 half double crochet in the next 2 stitches, 1 double crochet in the next stitch, 2 double crochet in the next stitch, 2 triple crochets in the next 2 stitches.
Chain 2 and slip stitch into the bottom of the first stitch of row 1.
Fasten off, leaving a long tail.
Assembly
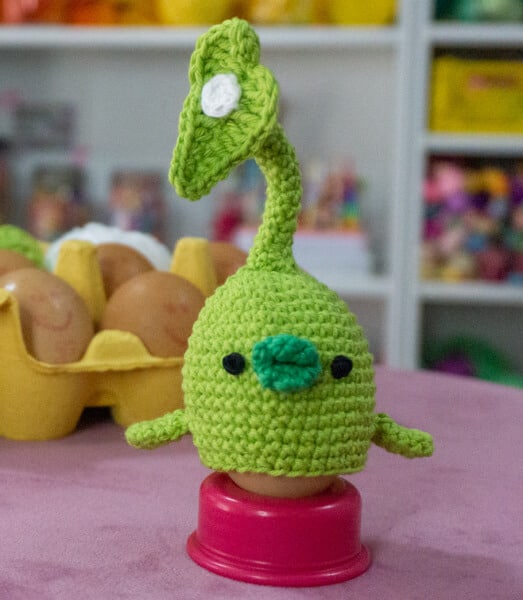
Start by sewing the dew drop onto the upper centre of the leaf, weave in the remaining tail and snip. Next, using the long tail of the leaf, sew the leaf onto the top of the stem (the first round of the stem, the rounded end, not the open end). Then sew the stem onto the centre of the head/body.
For each wing, press both sides of the opening together (like we did with the beak) and using the tail, sew the two sides together, to form a seam. Repeat for both wings.Begin by pressing both sides of the beak opening together, and using the tail, sew the two sides together, to form a closed seam. Repeat this on the second beak piece. Next, sew the two beak pieces together by a tail from either beak piece and holding the two beak seams together, one on top of the other; sew through both beaks, to form a single beak. Use what is remaining of the tail, to sew the beak to round 11 of the body. Weave in any remaining seams.

Sew each wing to the each side of the body, between rounds 13 and 14, again using the stem to guide you for placement.
Lastly, we will sew on the eyes. Using a darning needle and black yarn, sew two eyes, one of each side of the beak on round 11. I sewed them on using an embroidery technique: French Knot.
To make a French Knot for the eyes; insert the darning needle inside the body, and pull out through a stitch to the outside, where you would like the eye to be. Wrap the yarn around the needle, 4 times and keep it taught, while pushing the needle back down through the closest stitch. Pull through tight on the other side. A little knot should have formed for the eye. Now repeat on the other side.
Alternatively, you could use small circles of black felt to make the eyes (safety eyes will not work, as the backs will crack the egg inside).
Now, carefully slip your finished Korpokkur Kid egg cosy over your egg, and you are finished!


Recent Comments